Flatbreads are incredibly versatile, and they’re a healthy addition to nearly any meal. If you’re in the mood for Indian flavors, chapatis are great for bringing those flavors to the table. They’re yummy, easy to make, and pair well with almost every Indian dish.
What is this type of flatbread, and how can you make it?
Let’s dive into all that and more with our favorite chapati recipes. By the end, you’ll be ready to spice up your next dinner or satisfy a flatbread craving in style.
What Are Chapatis?

Chapati, sometimes spelled as chapatti, chappati, chapathi, or chappathi, is a type if unleavened flatbread that originates from India.
Also known as roti, chapati bread is traditionally made from atta, which is a kind of whole wheat flour. Atta is mixed with water, oil, and sometimes salt, then cooked on a tava, or a flat skillet.
History and Origin
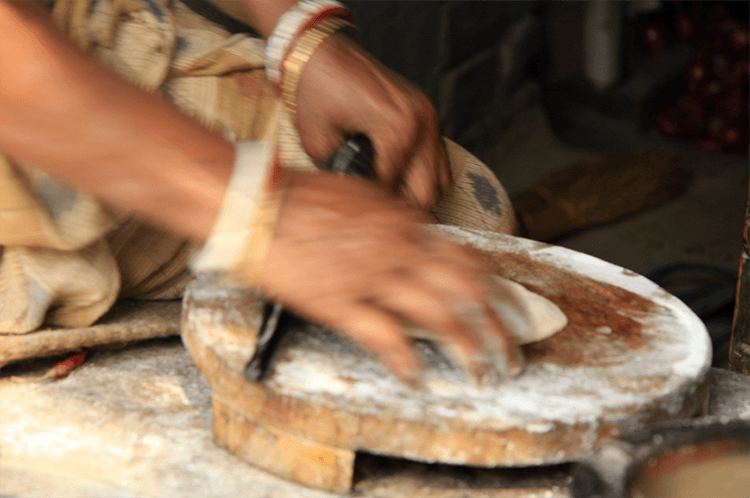
Chapati takes its name from the Hindi word ‘chapat,’ which means ‘slap’ or ‘flat’. This describes the traditional method of making chapatis; the thin, round dough is shaped by slapping it between the palms of two hands. As the dough is slapped, it is rotated, forming a rounded shape.
Chapatis are a staple food in India even today. Throughout history, chapatis were introduced to other parts of the world in a gradual climb.
They were mainly brought to Central Asia, Southeast Asia, East Africa, and the Caribbean Islands by Indian merchants and immigrants. To this day, people across the globe enjoy this versatile dish, putting their own spin on the Indian staple.
Regional Varieties
The method of forming and cooking chapati stays consistent throughout India, as well as most parts of the world. However, the versatility of chapati lends itself to many variations, all of them equally delicious.
Paneer chapati refers to a variation in which grated paneer is added to the dough. Radish or mullangi chapati is thicker than most types, and the dough is mixed with turmeric powder. Vegetable-stuffed chapati is filled with a gravy made of carrots, potatoes, peas, and fenugreek. Alloo paratha – which is a chapati stuffed with boiled potatoes and onions – is commonly found in Northern India.
What Can You Eat With Chapatis?

Chapatis are a staple in Indian cuisine, and you will be able to find it alongside pretty much every meal. For a choice of dishes that would be good to pair with chapati, check out this list here!
Other than pairing it with Indian dishes, you can also put your own spin to this versatile dish. Switch out normal white bread with this healthier alternative when making sandwiches, or eat chapatis with fillings that you’d normally see in tacos — the list is endless.
Of course, you can also enjoy chapati all on its own. No need to make sauces or gravies; a savory version can be made with just butter and salt, and you can even create a dessert out of this flatbread by mixing in sugar and butter.
What is Chapati Flour?
When looking at an Indian chapati recipe, you may come across an ingredient called chapati flour. Note that this refers to any type of flour that is used to make chapatis. Chapati flour can be bought from stores, but it can also be homemade.
Chapati flour comes in two main types: maida and atta. The main difference between the two is whether or not their grains where processed whole. Atta is the Indian term for whole wheat flour, while maida is the Indian term for white wheat flour.
Atta
In India, chapati is commonly made using atta, also known as chakki atta. Like maida, atta is milled differently compared to the usual whole wheat flour found in Western markets, which is milled using rollers.
On the other hand, atta was traditionally made by grinding wheat on a stone mill. This has eventually been scaled up to an industrial level. The stone milling process that atta undergoes results in more damaged starches, which lets the flour absorb more water. This leads to a stickier dough and a softer bread once baked.
Maida
Maida is the Indian term for white flour, meaning it’s not made from whole grain. Maida is often cheaper and can be stored longer, although it is less nutritious. Maida is also marketed in India as all-purpose flour, although it is different from the kind you may find in Western markets. In this vein, maida can be used to make other recipes, like cakes.
For those who bake other types of breads, maida is often more convenient and accessible than atta.
Note that when you’re looking at chapati recipes, you may be asked to use atta, whole wheat flour, or chapati flour. Know that these are functionally the same; just note that whole wheat flour sourced from Western markets may have a slightly drier dough.
Of course, the moisture content of dough often creates a very small difference in the end product. Just remember to switch up your water ratios as necessary.
How to Make Chapati Flour
If you love to make things from scratch, good news: you can make chapati flour fresh.
Creating your own flour ensures that it’s healthy and pure. You can rest easy, knowing there aren’t any preservatives and additives unless you’ve incorporated them!
On top of that, you can also customize the taste and texture of your flour by mixing and matching grain choices. If you’ve already made flour from scratch before, the steps for making chapati flour will be very similar.
Procedure
- To make chapati flour, you will need some whole grains. This recipe from Sharmi’s Passions uses samba and Punjab wheat at a 2:1 ratio. These are a good point of reference for future recipes, but feel free to explore other grains and different ratios. For example, check out this multigrain atta recipe, which incorporates oats and maize among other grains.
- Once you have your grains, you can opt to clean them with a quick rinse under water. Mix the grains and, if you cleaned them, allow them to dry completely. Ensuring they’re completely free of moisture will ensure they grind much faster and avoid smashing. If possible, lay them out under direct sunlight.
- Once dry, transfer your grains to a mill and start grinding! After grinding, spread them on a plate to let them cool down.
- Once cooled, pass the flour through a sieve to remove the coarse bits retained after grinding. If you want a coarser texture in your breads, feel free to skip this step.
How to Make Chapati
Chapatis are very easy to make, although you may need to experiment with your flour and water ratio, depending on the type of flour you’re using.
This chapati recipe serves as a great base, which can be customized and played with. If you’d like to pair it with other Indian flatbread recipes, like paratha and poori, check out this list here.
Ingredients
- 2 cups of chapati flour.
- 1 cup of water.
- 1 ½ teaspoons of salt, optional.
- 1 to 2 tablespoons of oil (or unsalted butter, or ghee).
- Extra water for kneading.
Procedure
- Put the chapati flour in a bowl. Pour half of the water and flour in, and stir loosely with your fingers. If you choose to add salt, mix it into the bowl at this point.
- The result should be a crumbly dough. Add the oil until the dough becomes more pliant.
- Pour the rest of the water over the dough and stir until it forms into a ball. The ball should be sticky, but still hold itself together. Roll the ball of dough around the bowl to pick up stray crumbs.
- Lightly dust a flat surface with flour. Transfer the dough onto the floured surface and begin kneading. To knead chapati dough, make a fist and push the dough forward. Roll the outer edge into itself and do the same pushing motion again. Continue kneading until the dough holds its shape, is smooth, and does not leave any crumbs. If the atta is not pliant enough, moisten your fingers with water and continue kneading. Alternatively, you can also do this kneading inside the bowl.
- Once your dough has reached a smooth consistency, it’s ready to be used. At this point, you can continue kneading to change the consistency of your dough; when making chapatis, you’ll know it’s ready when it’s soft and stretchy. You should be able to easily leave an indentation on the dough with your finger without the dough being sticky.
- Divide the flour into about four equally-sized balls. Then, roll out each ball with a rolling pin on a flat, floured surface. They should measure about eight inches in diameter.
- Heat a pan or griddle and cook each chapatti, one at a time. They should brown and puff up; this will take about one minute per side. Serve warm.
How To Store Chapati Dough
Chapatis are best served warm, immediately after they’ve been cooked. Thankfully, chapati dough can be stored for later use.
Counter Top
You can put your chapati on a counter top for up to two hours – but remember to dampen the top of the dough or cover the bowl with a damp cloth.
Fridge
To store your chapati in the fridge, place the dough inside a tightly covered container. Your chapati dough can be stored this way for about a day.
Freezer
You can also freeze your chapati dough. Roll out the dough as you would before cooking it, and stack the individual disks. Wrap the stack in aluminum foil, and store inside a plastic freezer bag. Make sure that the bags stay flat, so that the dough keeps its shape.
When you want to cook your frozen chapati dough, you will have to thaw it first. The easiest way is to thaw it overnight in the refrigerator. For faster thawing, microwave your frozen chapati dough on a defrost setting.
Do not thaw your chapati dough on a counter top; leaving dough thawing in the open will encourage the growth of bacteria.
Once thawed, cook the dough just as you would cook freshly-made dough.
Gluten-Free Chapati
To make your chapati gluten-free, you need only swap out your flour for a gluten-free blend. Your ratios may be a bit different, and you may need to experiment with flour and water measurements during the first try.
You can also make your own homemade version of gluten-free chapati flour. Like the homemade chapati flour recipe mentioned above, you can play with the ratios and types of grains when creating your own blend.
As a point of reference, check out this gluten-free flour blend from Minimalist Baker.
Bread Machine Chapati
If you’re pressed for time, you can easily make chapati in a bread machine. This is especially great for people who need a large batch, or if you’d rather leave the kneading to someone—or something—else.
Here’s a good tutorial we found:
Ingredients
- 3 cups of chapati flour.
- 1 cup of warm water.
- 2 tablespoon of oil or butter.
- 1 teaspoons of salt (optional).
Procedure
- Following the order recommended by your machine (in the instruction manual, likely), add in the ingredients one by one.
- Set your machine on the “dough” setting and select the dough cycle.
- Let your machine knead the dough for about 15 to 20 minutes, or until you have reached the desired consistency.
- If this is your first time using a flour blend, or you have changed the ratio, keep an eye on your chapati. You may need to add some water while the dough is kneading; add 1 tablespoon at a time as necessary. As a rule of thumb, the higher the protein level in your flour, the more water it will need.
- Your finished dough should be smooth; poking the dough with your finger should easily leave an indentation.
Chapati flour is a wonderfully versatile recipe that is easy to make and deliciously healthy.
The next time you’re in the mood for something yummy and filling, why not whip up some chapati?